Easy pantographs for beginners
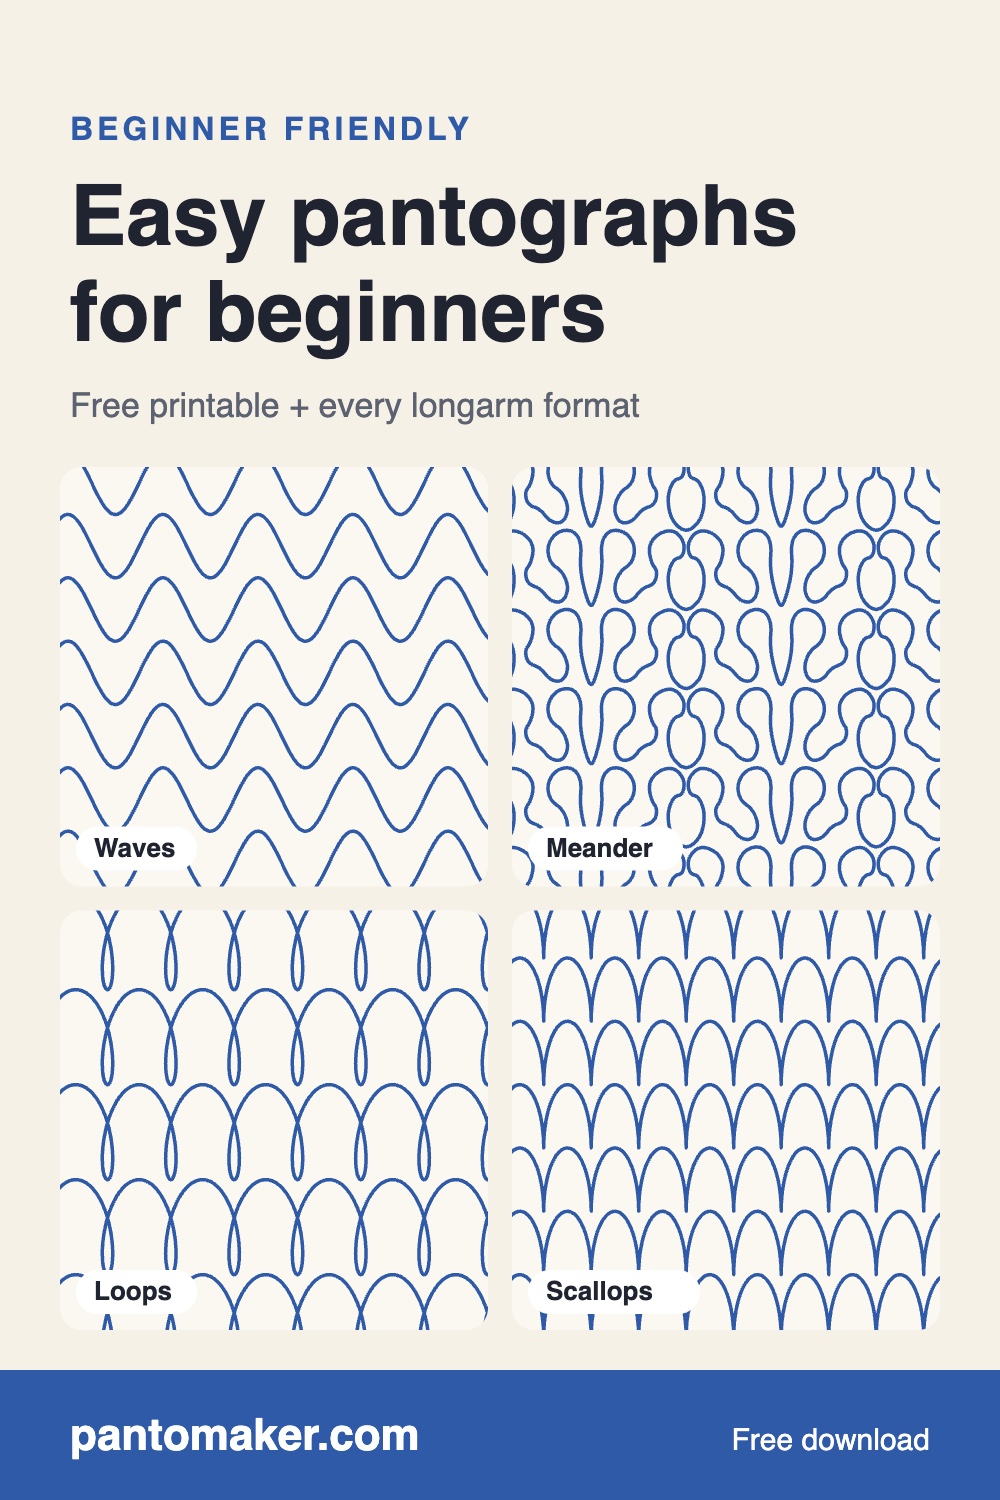
Four easy edge-to-edge designs for your first pantograph quilt: Waves, Meander, Loops and Scallops. Each one is free as a printable paper pantograph (PDF) for a hand-guided longarm and as digital files for computerized longarms (QLI, HQF, IQP, DXF, PAT, BQM and more), in one ZIP with no sign-up. Stitch them on any quilt, including quilts you sell. Below: what makes a pantograph easy to follow, the downloads, and tips for your first quilt.
Free beginner pantographs (PDF + longarm files)


- Waves is one smooth, gentle curve up and down. It never crosses itself and has no points, so it's the easiest line there is to follow.
- Meander is a relaxed, lobed line that never crosses itself and has no points. Because it's busy, a small wobble disappears into it.
- Loops cross themselves, but in the same steady rhythm every time: once you've stitched two loops, you know how the rest go.
- Scallops are round arches with one point at the bottom of each, where the arches meet on the baseline: a natural place to pause and look ahead.
Eight more classic designs are free the same way in the free pantograph library.
What makes a pantograph easy
- Smooth, flowing lines. Curves are easier to follow at an even speed than sharp corners, where you have to stop and change direction.
- Few or no points. Every point is a spot where the stitches bunch or overshoot if your speed is off. Waves and Meander have none; Scallops have one per arch, in a predictable place.
- Few crossings, or regular ones. A line that crosses itself at random makes you hunt for the path. Loops cross in a steady, repeating rhythm, which is easy to learn.
- Medium or large scale. Bigger shapes give you more time on each curve and fewer rows to stitch.
- A busy line hides wobbles. On Meander a slightly off curve just looks like part of the design. Precise geometry, like a Baptist fan's even arcs, shows every wobble, so the Baptist fan and clamshell make good second or third quilts rather than first ones.
Printing the paper pantograph
Each free ZIP includes a printable paper pantograph PDF on Letter sheets, 60 in long. Print every page at 100% / actual size (turn off "Fit to page"), measure the 1-inch square on the first page, then overlap and tape the sheets in order. For A4, a longer pantograph, or one long page from a print shop, open the design in PantoMaker and set the paper there. How to print a paper pantograph walks through every step.
Your first pantograph quilt
- Practise on a scrap sandwich first. Use the same batting and thread as the quilt and stitch two or three rows until the line feels natural.
- Keep a steady speed. Most wobbles come from speeding up on easy stretches and slowing down on curves. Even hand speed (or stitch regulation, if your machine has it) helps most.
- Look ahead along the line, not at the laser dot or stylus itself, the way you'd look down the road when driving.
- Line up each new row with the last one. After you advance the quilt, check that the new row starts at the same point of the pattern and at the right distance from the row before.
- Don't stop mid-curve. If you need a break, stop at the end of a row or, on Scallops, at a point.
Sizing for your machine
Keep the row height inside your machine's usable quilting space, which is less than its throat space once you leave room to advance the quilt. In PantoMaker, open a design and set Repeat width and Row height; the classic designs are free at any size. Here is what the four take on a 60 × 72 in throw, with rows running 2 in past each edge and spaced at their own height (numbers from PantoMaker's own layout code, rounded):
| Design | Repeat × row height | Rows | Stitching |
|---|---|---|---|
| Waves | 12 × 4 in | 20 | about 70 yd |
| Waves | 18 × 6 in | 13 | about 45 yd |
| Meander | 12 × 5 in | 16 | about 130 yd |
| Meander | 18 × 7.5 in | 11 | about 90 yd |
| Loops | 12 × 6 in | 13 | about 90 yd |
| Scallops | 12 × 4 in | 20 | about 120 yd |
Bigger rows mean fewer passes, but the open spaces must stay within your batting's maximum stitching distance (it's on the package). What size pantograph do I need? explains row height, repeats and batting in more detail.
Computerized longarm?
The same four designs come as digital pantographs in the same ZIP: QLI, HQF, IQP, DXF, PAT, BQM and more. Each file is one repeat that starts at the left and ends level on the right, so your quilting software can size it, repeat it across the row and stack the rows. Not sure which file your system reads? See longarm quilting file formats.
Ready for more?
Once these feel easy, try a design with more shape: the free Leafy vine (leaf points on a smooth vine) or the Baptist fan. Or draw your own line; how to design a pantograph shows how.
Before you stitch
As with any new pantograph, load it (or tape up the paper), check the size, and stitch a test row on scrap first. If something looks wrong, email support@pantomaker.com with your machine and software version.